Inside: Take basic watercolor tartans and plaids to the next level by varying the line quality and adding more color. Bonus: How to make unique shamrock accents with heart dies.
Lassie, it’s your lucky day! Because we’re not only painting more watercolor tartans, we’re taking them next level by adding more color and more line variety.
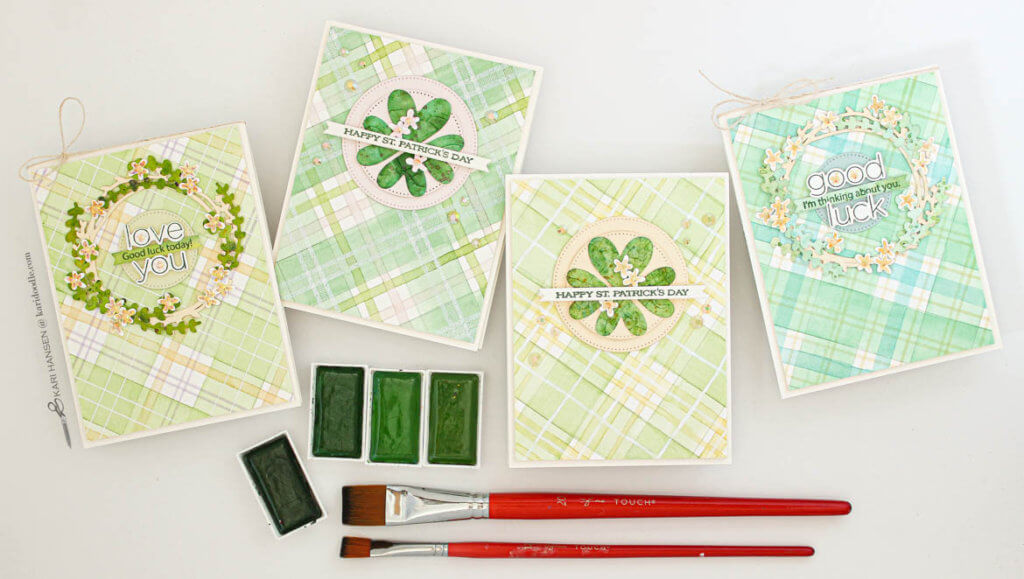
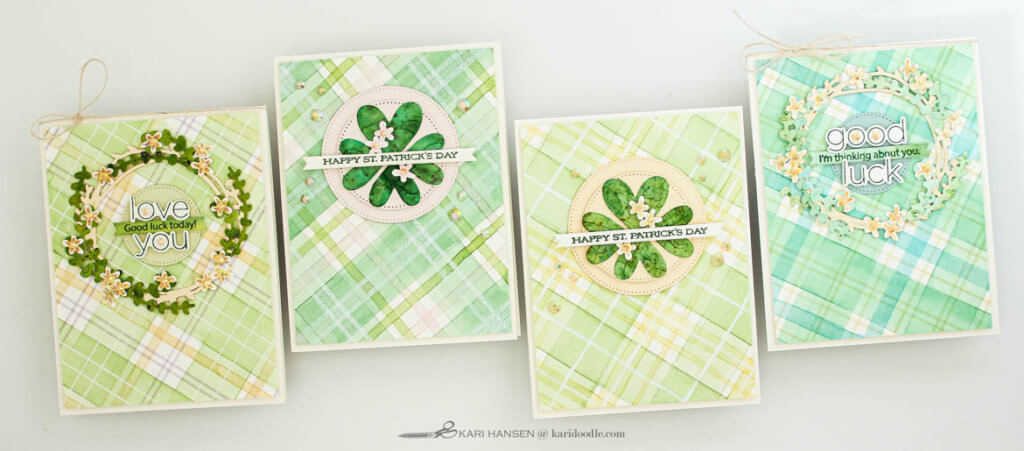
Before we begin painting, let’s take this tartan tour on a quick diversion from Scotland to Ireland. I’ve made these tartan examples with an Irish twist in honor of St. Patrick’s Day, painting them all in verdant hues of green. Then I’ve crafted the tartan panels into cards embellished with shamrocks and flora inspired by the emerald hills of Eire. I love all that fresh green!
Let’s channel our inner (or honorary) Irish and get started!
In this post:
Build on the Basic Watercolor Tartan Method
In a previous article, I walked you through the process of making simple, beautiful tartan patterns with watercolors. That post includes step-by-step instructions in addition to the 11 top tips and tricks you need to know to make painting tartans practically foolproof.
Get the basics: This is How to Make the Best Simple Watercolor Tartans
Now let’s step it up by building on those basics to create watercolor tartans with more complex patterns. We can add variety to our tartan designs by changing up the color, line width, and line quality.
But we’re still keeping it simple, and we’re still working from the same foundation. Here’s a summary of that foundation, including which aspects we’ll be using as-is and which ones we’ll be tweaking. (Jump over to my other article for a deeper review of the simple watercolor tartan guide.)
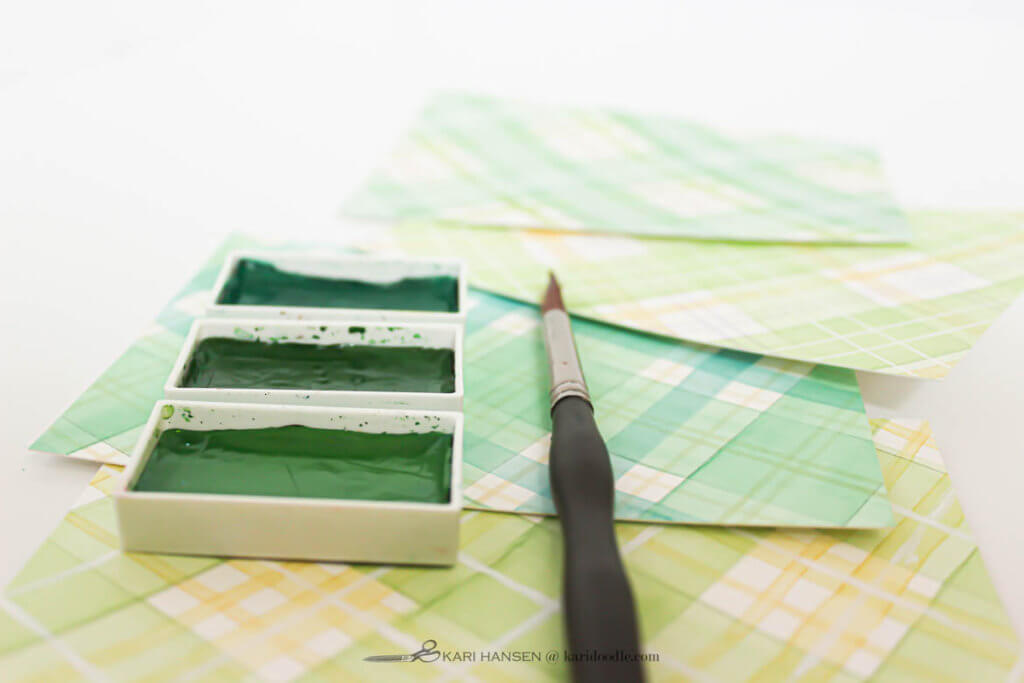
These parts of the method will remain the same:
- Orient the grid: Use a diagonal orientation for a dynamic visual look.
- Angle the pattern: Chose a 30- to 35-degree pitch when penciling in the guidelines to soften the angle from a harsh 45 degrees from corner to corner.
- Pencil in guidelines. Use a T-ruler and pencil to draw in light lines for structure when you start painting. This step helps your tartan pattern stay even and defined.
- Plumb the perpendicular. The lines in both directions are perfectly square, 90-degree angles.
- Design with symmetry. Create symmetrical gridding and overlapping where the stripes intersect by repeating the same pattern in both directions.
- Maintain white space. Give the pattern and paints room to breathe by making the white of the paper part of the design.
- Embrace blooming and slight imperfections. Don’t sweat it if your stripes are a little wonky or the paint blooms here and there. Your hand-painted pattern will look perfectly imperfect.
- Dry for definition. In order to keep your edges defined, let the bands in one direction dry completely before painting the perpendicular stripes.
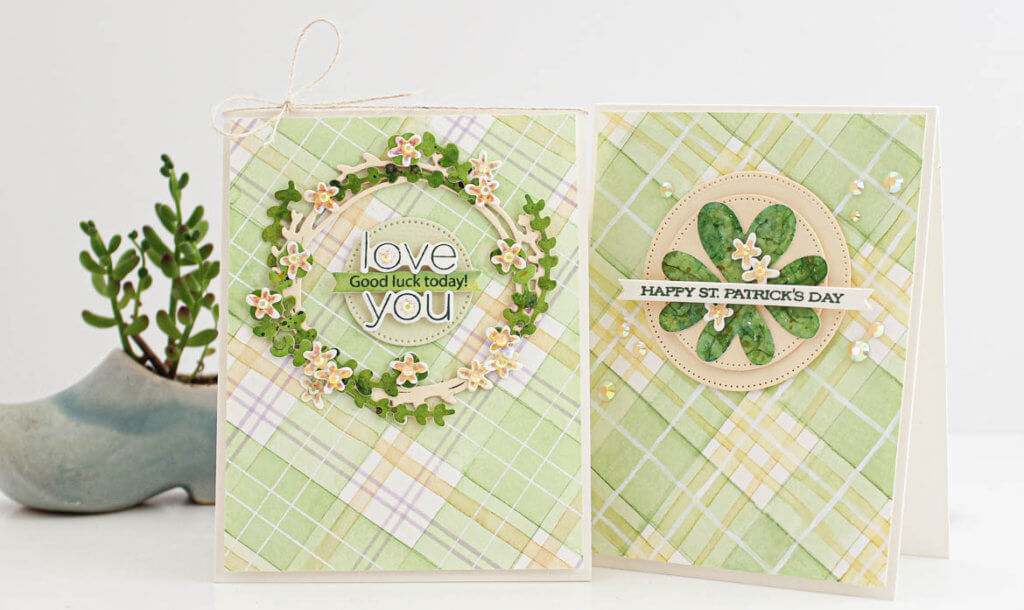
But we’ll change up these three parts in order to add more variety to our tartan design:
- Simplify the color palette: Instead of a mostly monochromatic scheme, we’re now going to work with two- and three-color palettes.
- Vary the stripe width. Vary the design even more by playing with skinny double stripes, a simple hatch-pattern stripe, or additional narrow bands.
- Finish with fine lines. Go beyond using a white gel pen for the fine lines on your tartan. Try other mediums such as gouache, markers, and stamping inks.
Let’s talk in more detail about how we’ll implement the changes to these three parts of our tartans.
Crank Up the Color Scheme
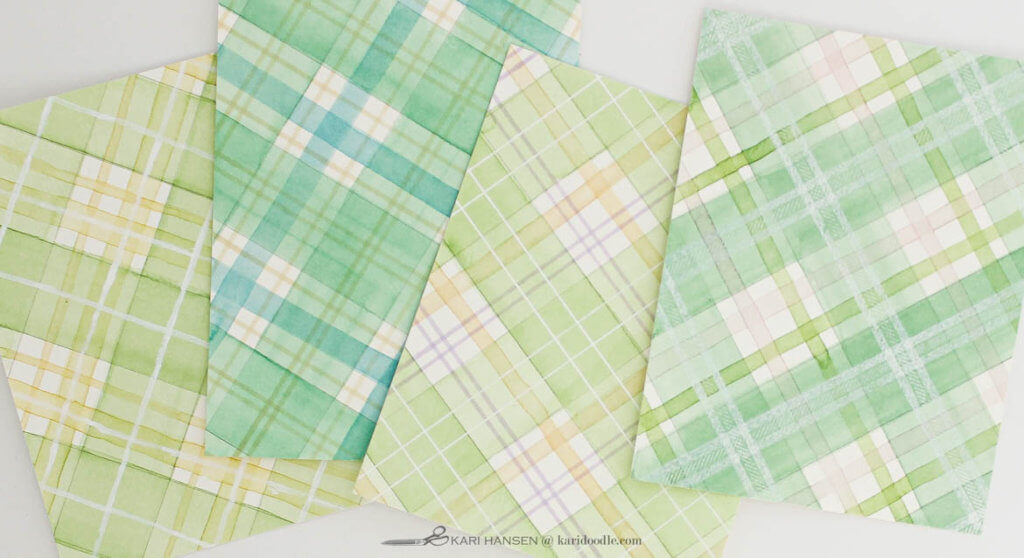
A monochromatic color scheme is perfect when first starting to paint watercolor tartans. But once you get the hang of it, adding another color or two to the mix is an opportunity to add variety to your designs. As we start adding more color, we’re not going too crazy, but we can easily level up to two- and three-color palettes with a bit of practice.
To do so, start by choosing a main color for the widest band. Then pick one or two accent colors for the narrow stripes and fine lines. Decide if you want to add those supporting colors in watercolor stripes, with acrylic paint, stamps, gel pen, or markers. Then plan out how you want to place those stripes within the available white space.
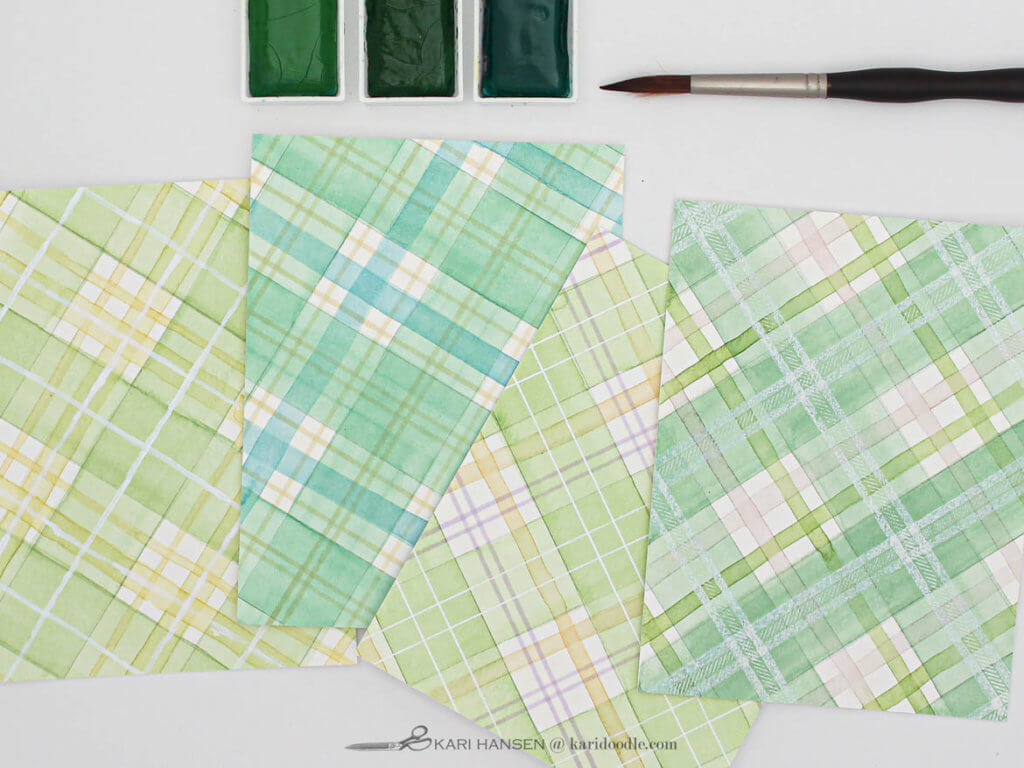
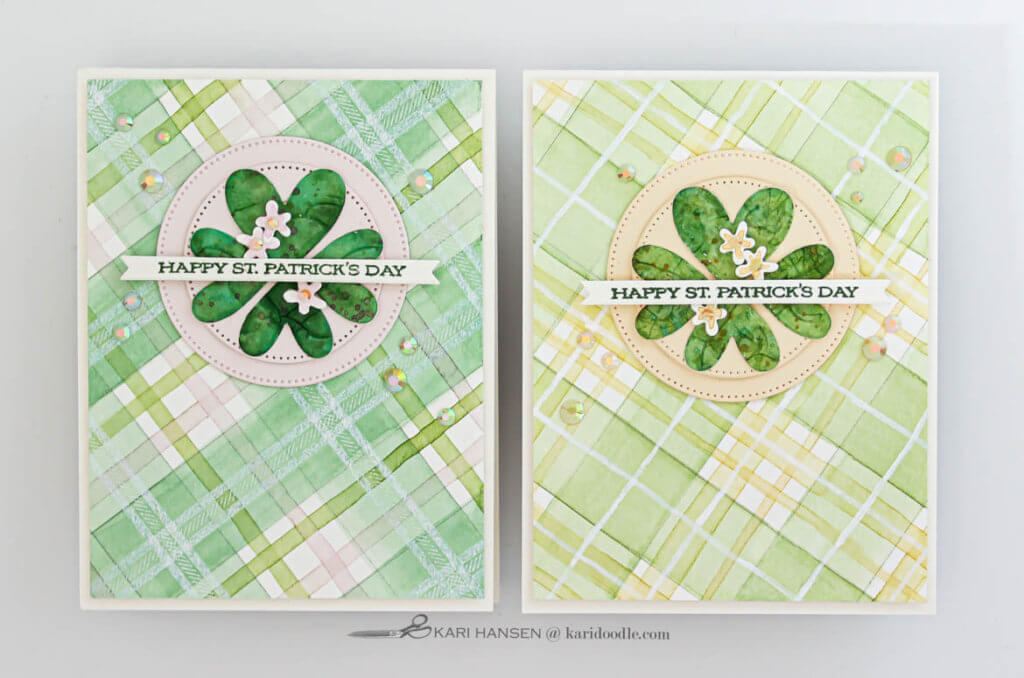
The four tartans shown here are all in the green family, and yet each palette varies depending on the shade of green and its supporting hues. In addition, you can see that I added the second and third colors in a variety of places and widths within the design.
Step Up the Stripe Width
Along with color, shake up the pattern by varying line widths within the basic tartan structure of alternating thick and thin bands. Here are some ways to do that:
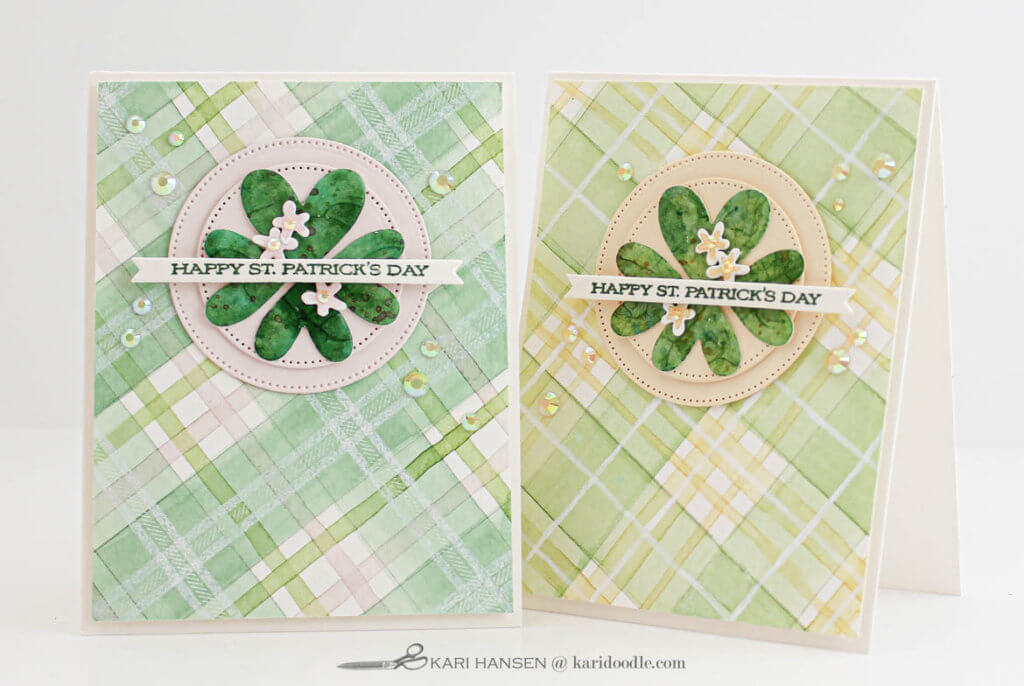
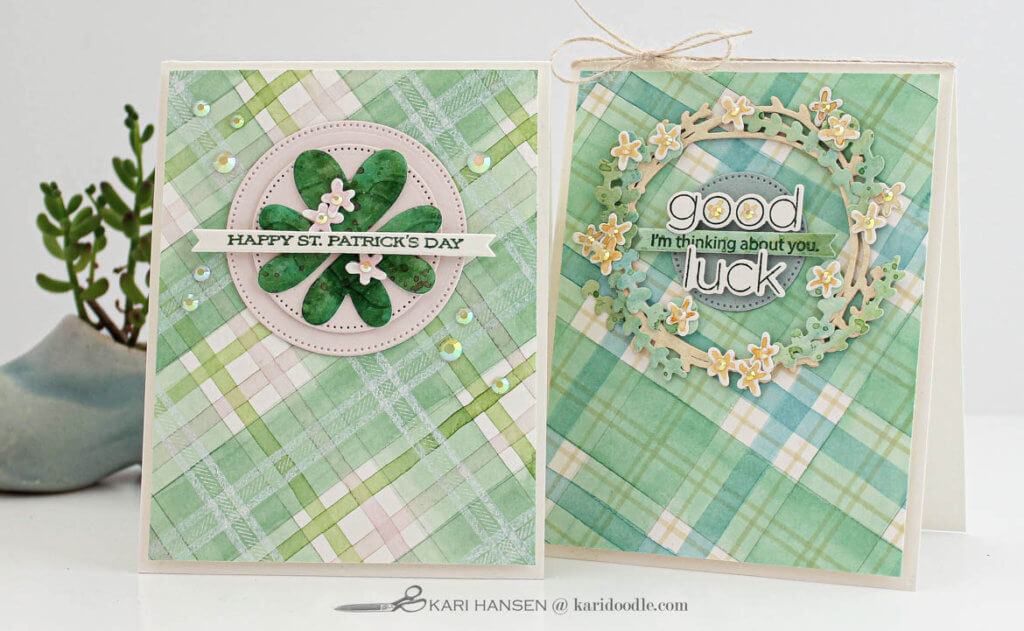
- Center two narrow bands in between the wide stripe, like I did with pale pink and grass green stripes on the green-and-pink shamrock card.
- Paint a wide and skinny stripe combination as seen on the green-and-yellow shamrock card.
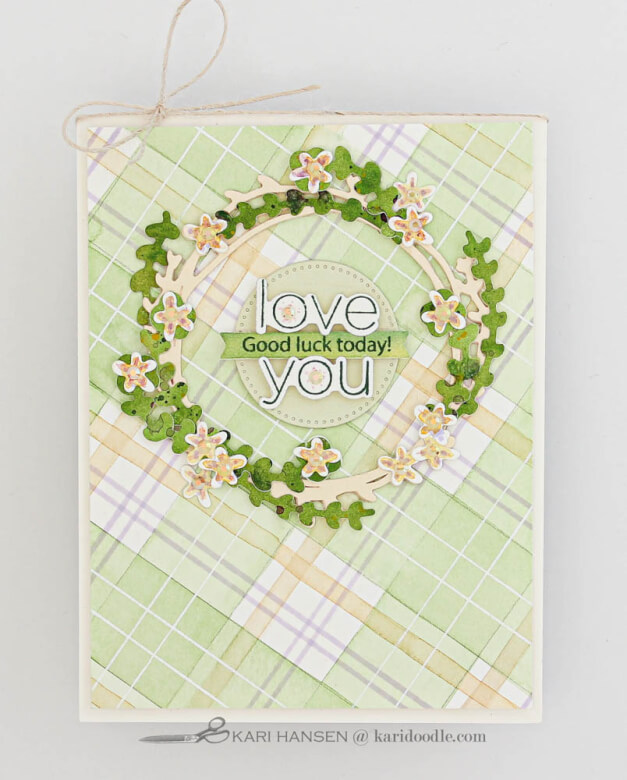
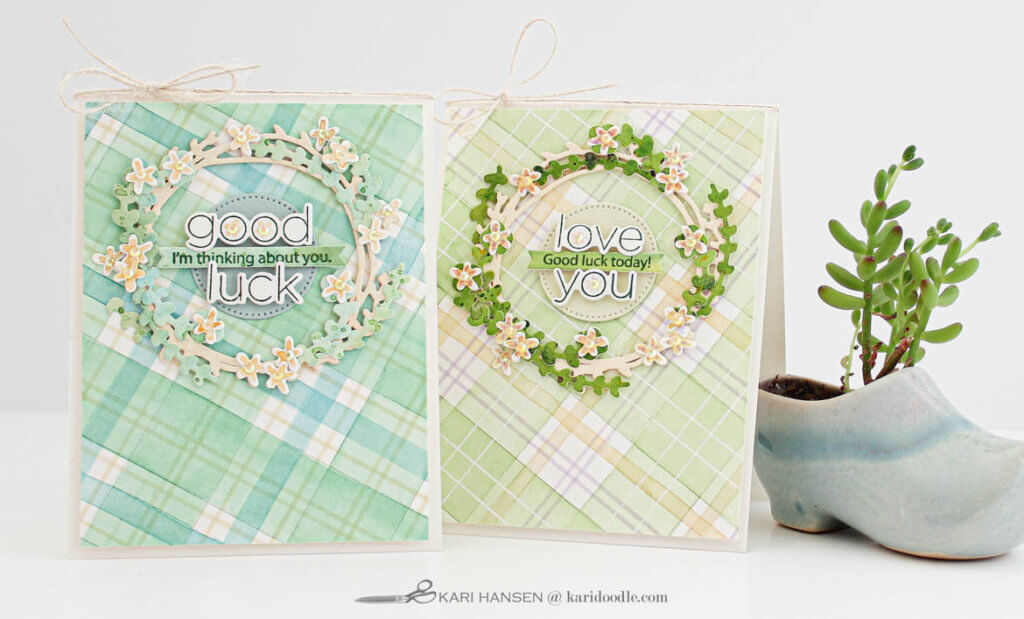
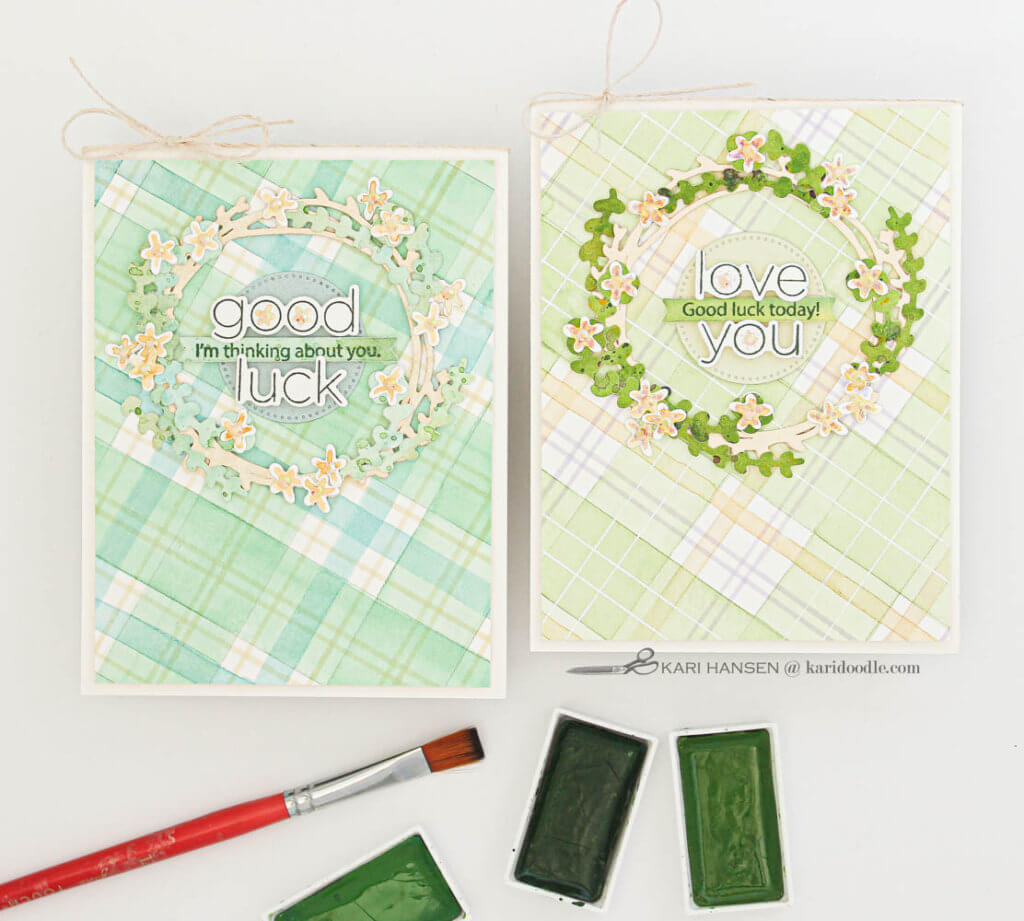
- Draw in a pair of skinny parallel lines with a marker and ruler. The lime-green wreath card uses a purple pair.
- Stamp in a simple hatch-pattern stripe or one thick band. While I used a stamp on the kelly-green wreath card to add fine lines on top of a wide painted band, the same kind of stamped stripes could be added in the white spaces in colored ink. These stamped bands could replace painted narrow ones.
- Use both painted and stamped side by side. The difference in texture between the two would provide interesting contrast within the overall tartan pattern.

Level Up the Lines
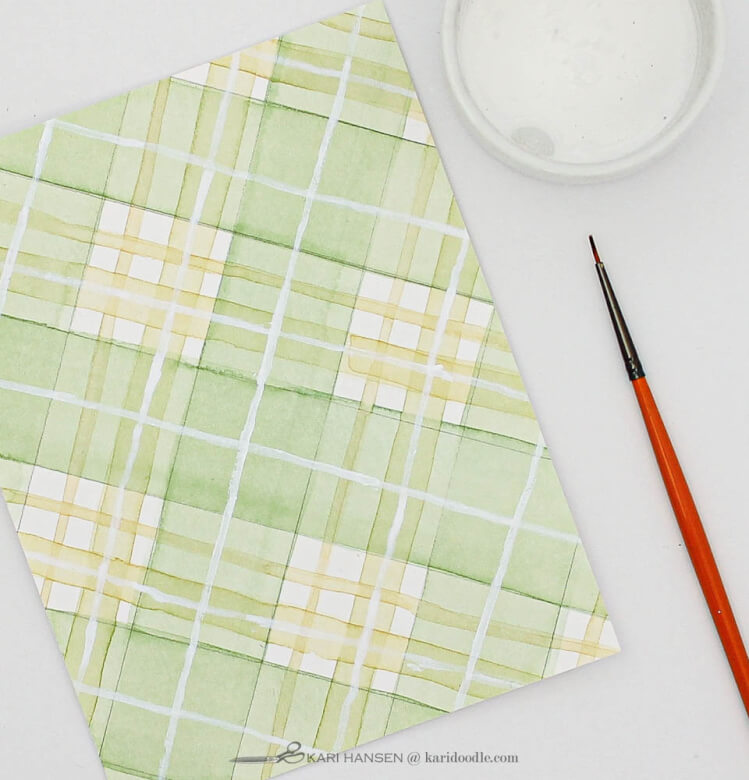
For our first foray into watercolor tartans, we used a #10 white gel pen for all the accent fine lines. I like using gel pens on my tartans because they provide an opaque white finish and are easy to control.
But to branch out from white gel pens, give other mediums a whirl. Anything that can make a fine yet distinctive line is a possibility. My examples used these mediums:
Remember that fine lines can be placed both in the white spaces and on top of painted bands. Keep it simple with just one kind or mix it up with several.
- White acrylic craft paint or gouache: With a tiny brush (#18/0) and a steady hand, use watered-down opaque paint to add skinny stripes. Lines applied in this manner will have a painterly, hand-drawn quality. Other colors could be used besides white, but the palest hues are the most forgiving. My green-and-yellow shamrock card sports this kind of fine line.
- Alcohol markers: I like how the fine-tip end of markers like Copics can provide precise lines in a rainbow of colors. Because of the control, we can use alcohol markers to add accent lines in between narrow white spaces, as seen on the kelly-green wreath card. We can also create easy double-lined patterns, like the purple line-duo on the lime-green wreath card.
- Ink and stamps: On the green-and-pink shamrock card, I used white pigment ink and the Happy Plaid stamp set (Concord & 9th) to stamp a group of fine lines down the middle of the widest stripe. The hatch pattern easily adds visual texture to the design. Using a stamp positioning tool (MISTI) and a grid transparency were instrumental to help me line up the stamp evenly within the watercolor bands.
Doodle tip: Got Paint Pens? I’ve experimented with using paint pens to add the finishing fine lines but the results were hit and miss. When using paint pens for a solid line, against a ruler, the delivery can be too unpredictable and the color too sheer. However, I’ve found success with paint pens when I pick metallic colors and use them to make dotted or dashed lines. I’ll use paint pens this way in a future article.
Timely Tips for Stepped-up Tartans
Go for the pale. Paler colored bands, with more transparency, tend to be the easiest to put together in a pleasing way. Lighter colors with low contrast readily get along, while darker colors with higher contrast find it harder to play nice as a team. If you want a darker stripe somewhere in your pattern, reserve it for your narrowest bands and fine lines.
Do a quick test of your color scheme and pattern before you commit to your watercolor panel. Use colored pencils or watercolors to make a down-and-dirty thumbnail sketch of the colors and pattern on sketch paper. Keep it small (around 2 x2”) and fast, and don’t worry about precision. This is just a color and pattern test run. If you’re not happy with the results, try again with your quick sketches until you find a pattern you like.
Step-by-Step: Craft the Tartans into Leafy Luck Cards
This is how I turned my bits o’ green tartans into good luck and St. Patrick’s Day cards:
#1. Create wreath or shamrock circular embellishments. See the end of this post for shamrock instructions.
To make wreath:
- Using watercolors on cold press watercolor paper, paint a panel in a shade of green that coordinates with the tartan color palette. Add washes of color as needed and finish with some light paint splatters. Let dry.
- With dark green die ink, stamp small sentiment (Messages for Everyday stamp set) onto green watercolor panel. Stamp words (Clean Line Everyday stamp set) onto white watercolor paper or ivory cardstock using same ink.
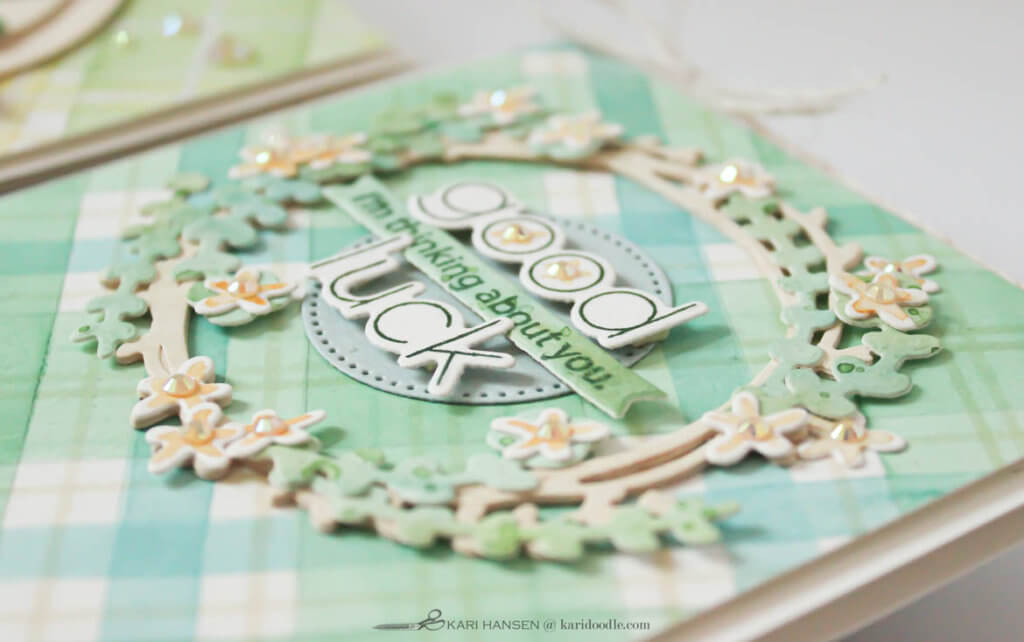
- Die-cut small wreath from light yellow cardstock four times with Wreath die set (Spellbinders). Stack and adhere all pieces together. Cut leaves from green watercolor panel. Cut flowers from white watercolor paper. Die-cut words and small sentiment strip. Use a pierced circle die set to make a 2x-stacked circle about 1.5” in diameter from light green or blue cardstock.
- Paint centers of little flowers, then adhere buttercream jewels to centers. Add the same to the Os in the stamped words.
- Assemble leaves and flowers on wreath and adhere with liquid glue. Arrange words and small sentiment onto circle die-cut and adhere with foam tape.
#2. Trim finished watercolor tartan panel to 4 x 5.25”. Attach shamrock embellishment or wreath/sentiment set to top half of tartan panel. Mount panel with craft foam or foam tape onto top-folding A2 (4.24 x 5.5”) made from heavyweight ivory cardstock.
#3. Tie hemp cord in a bow at top of wreath card. Add a sprinkle of buttercream jewels to shamrock card.
My Erin-inspired tartan cards turned out so fresh and fun, they make me feel as cheerful as a leprechaun loose in Gringotts. I’m looking forward to sending some lively love and luck when I drop these in the mail. No matter what colors you picked for yours, I hope you’ll be heel-clicking happy with your stepped-up tartans!
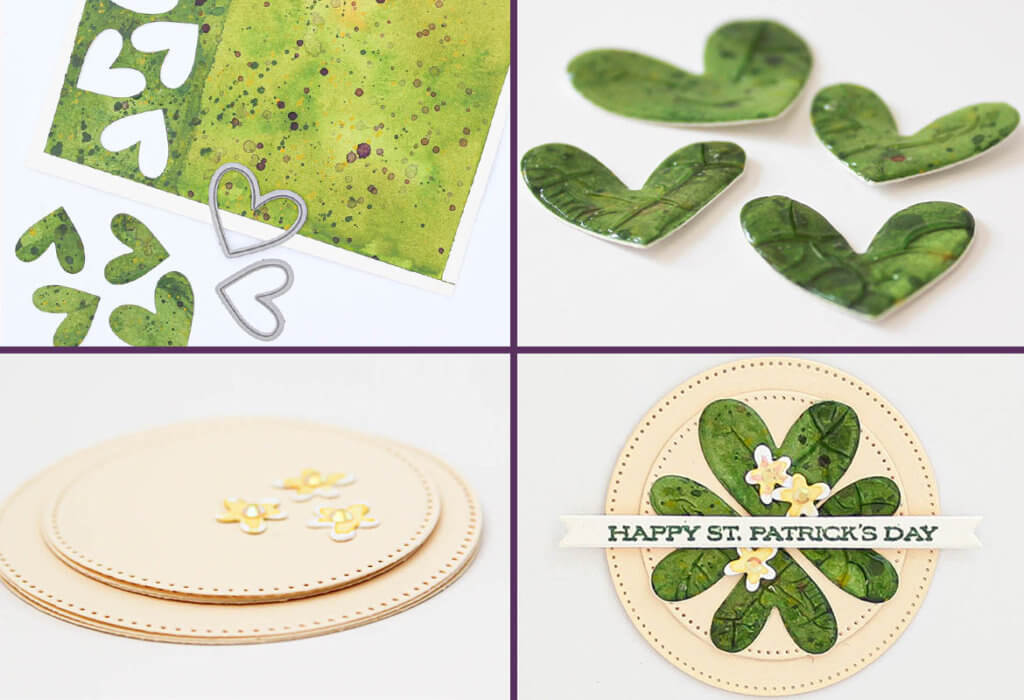
Bonus: How to Make Shiny Shamrock Embellishments
- Tape a small piece of watercolor paper to a hardboard (a 1.5 x 4.5” painted area is enough to cut four hearts). Wet the paper with clean water using a wide flat brush. Drop on watercolor paint in shades of green. Let dry or dry with heat tool. Repeat with one or two additional layers of paint, drying in between. Now splatter a bit of paint on top, in a darker green and one or two contrasting colors. Let dry.
- Die-cut one large and three medium hearts from watercolor panel using the Lots of Hearts die set or similar. Lightly tack hearts to a craft mat or piece of plastic with adhesive runner. Coat each die cut with a thin layer of Glossy Accents. Use a toothpick as needed to push Glossy Accents to the very edge of each die-cut and to fill in any gaps in the coverage. Let dry for 2-3 hours or overnight. Once dry, peel die cuts from craft mat. (This large of a glazed area can crack and craze as it dries. But no worries—it looks cool this way!)
- Use nesting pierced circle dies to cut circles from cardstock in two sizes: one slightly smaller than the hearts when laid in a shamrock pattern, and one about ½” larger. My circles are 2” and 2.5” in diameter. Cut two to three of each size and stack together with liquid adhesive, first stacking the small circles, then the large circles, then attaching the sets together.
- Die-cut the three small flowers (included in Wreath die set) from watercolor paper. Paint a rounded asterisk-shape in the center of each with very pale, diluted watercolor paint and a tiny liner brush. Adhere a jewel to the center of each flower.
- Arrange hearts into an evenly spaced shamrock shape on the smallest of the circle stack, placing the largest heart at the top center. Adhere hearts to circle. Use foam tape to place stamped sentiment strip across the center. Add the finishing touch by arranging and adhering the flowers to the shamrock.
Supplies
- Wreath die set, Spellbinders
- Lots of Hearts die set, My Favorite Things
- Pierced circles nesting die set
- Sentiment strip die set, Pink & Main
- Keep it Simple: St. Patrick’s Day stamp set, Papertrey ink
- Clean Line Everyday stamp and die sets, Simon Says Stamp
- Happy Plaid stamp set, Concord & 9th
- Messages for Everyday stamp set, Simon Says Stamp
- Watercolor paper, cold press, Canson XL
- Gansai Tambi watercolor set, Kuretake
- Glossy Accents, Ranger
- Buttercream jewels, Pretty Pink Posh
- White gel pen size 10, Sakura
- White acrylic craft paint
- Unicorn pigment ink, Hero Arts
- Mountain Pine dye ink, Altenew
- Golden yellow and light purple alcohol markers
- Ivory cardstock #110
- Light blue, pale yellow, pale lime, and pale pink cardstock
- Burlap hemp cord in natural, May Arts
Tools & Adhesive
- Platinum 6 die cutting machine | Spellbinders
- Misti stamping platform | My Sweet Petunia
- Sewing machine
- Paper trimmer
- Blending brushes | Taylored Expressions
- Heat tool | Wagner
- Photo printer | Epson
- All-in-one laser printer | Brother
- Scoring board
- Teflon bone folder
- Jewel picker | Katana
- Tag punch board | W R Memory Keepers
- Binding edge punch | EK Success
- Grid Transparency | Simon Says Stamp
- Small fine-tipped scissors | EK Success
- Distress Sprayer | Tim Holtz for Ranger
- Twist-Erase 0.5 mechanical pencil | Pentel
- T-square ruler
- Tweezers
- Hole punch
- Mini hole punch
- Black Velvet watercolor brushes, round #4, 8, 12 | Silver
- Watercolor brushes: purple handled round brushes set of 12
- Watercolor brushes: flat and round set of 7 in case
- Watercolor brush: #18/0 short liner
- Round paint palette, plastic
- Ceramic paint palette
- Hardboard
- Foam adhesive | Scotch 3M
- White ½” foam tape | iCraft
- Black ½” foam tape | iCraft
- Precision Craft Glue | Bearly Art

